The development of computer networks at the moment is amazing with lots of connective tissue found in a variety of alternatives to facilitate users in selecting hardware support computer networking. One of them with WDS. What is WDS? WDS stands for Wireless Distribution System, which means that distribution systems are designed for Roaming Wireless hotspot environment.
For more details about the WDS problem let us take a scenario where a hotel / small office should be covered by a wireless signal, so that visitors can access the Internet. In most cases like this, one wireless Access Point is not required to provide the desired coverage, and thus, the second wireless access point must be integrated into the environment. This does not leave the main problem to be solved because of the fact that usually there are only two ways to get the two Access Points to communicate with each other, the first being for both Access Points wired together with CAT5 cable networks, and the second to run the Wireless bridge between two Access Points. Both these roads are not wrong but this solution is very heavy because they add additional cost and will certainly have trouble at the time of installation network. The best way to solve a problem like this is WDS, which is a means to obtain a second access point to communicate with each other and clients at the same time.
This paper is intended to show you how to manage two or more Access Points (Using MikroTik), to be able to communicate with each other, and broadcast the signal to wireless clients at the same time.
Here are presented a picture that was the problem mentioned above:
The last step is to add the IP address for MikroTik router to be used. Click on the 'IP' and then 'Address' and add the new IP address by clicking the '+'. In the column 'Address', you can type the IP address of your choice (for this example we will use .168.10.1/24 '192' and to 'Interface' field, select 'bridge1' Click 'Apply' and 'OK'.
That's it! Have successfully set up the WDS network between two or more Access Points. Each access point in WDS network will do the setup in the same way as I show here. The only thing that will change from Access Point to Access Point is an IP address. In short, all the SSID's, Frequency, Band, Bridges, etc. will be the same between different access points, apart from an IP address.
This paper is intended to show you how to manage two or more Access Points (Using MikroTik), to be able to communicate with each other, and broadcast the signal to wireless clients at the same time.
Here are presented a picture that was the problem mentioned above:
After logging into the Router BOARD, go to the menu 'Interface' and enable your wireless interface with the 'Tick' 'wlan1'. After that, double click Interface 'wlan1' and continue to 'Wireless' Tab. Here we will set the mode to 'ap_bridge' (which is the term MikroTik for Access Point), the 'SSID' to the name of your choice, 'The band will be set to the desired ISM band, and' Frequency 'will also be set to a variable of your choice . Please note that this setting must be identical on Router BOARD second. Once completed, 'Apply' and click 'OK'
The next step is to add interface 'Bridge' in which WDS will work. From the menu 'Interface', click the '+' and add 'bridge'. Once this is done, go to Tab 'STP' and select the option 'rstp' (This guards against the loop in a wireless network). If the option 'rstp' is not available, then just activate the 'STP' choice of terrain. Click 'Apply' and 'OK'
After the 'Bridge' you have been added, return to the setup screen by double clicking the Wireless interface 'wlan1' and proceed to 'WDS' tab. Once there, arrange 'WDS Mode' to 'dynamic' and set 'Default WDS Bridge' to interface 'bridge1' that we make on the previous page. Click 'Apply' and 'OK'
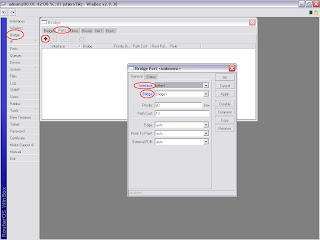
We have now finished with WDS configuration. The next thing to do is add an Ethernet port for 'bridge1' interface was created to enable communication via WDS links. Click on the button menu 'Bridge' and continue to the 'Ports' Tab. Add new port by clicking the '+'. At the option 'Interface', select the desired Ethernet port (for this document we will choose 'ether1') to be added to the bridge. On the choice of 'Bridge', select 'bridge1' interface created earlier. Click 'Apply' and 'OK'
That's it! Have successfully set up the WDS network between two or more Access Points. Each access point in WDS network will do the setup in the same way as I show here. The only thing that will change from Access Point to Access Point is an IP address. In short, all the SSID's, Frequency, Band, Bridges, etc. will be the same between different access points, apart from an IP address.


0 Comment